Friends and Users on Facebook 4
How to Hide Your List of Friends on Facebook
Do you want to hide your list of friends from people in it? Since May 2010 Facebook offers again the possibility to stop showing them on your profile. This guide will show you how to do it.
Once you have logged in to Facebook, on the top right of the page, click on the Account tab and then select the "Privacy Settings" option, which is the one highlighted in the next image: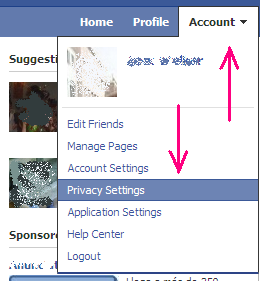
Once you have done this, in the area titled "Basic Directory Information," click on the link that says "View Settings," which is the one pointed by the arrow in the picture below: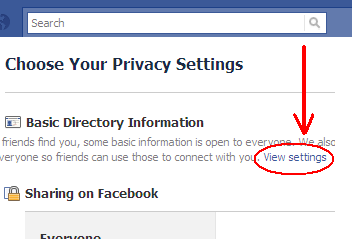
Once you have done that, you will be directed to a new page with a list of items. In that list, near the middle of the screen, look for the item that says “See my friend list”. At the right side of this item you will see a button. Click on it and a menu will appear, in which you will have to select 'Customize.' Then you will see a window with a drop-down list near a label that says “These people.” In that list, select 'Only Me,' and finally click on the button that says 'Save Setting.'
Keep in mind that, although your list of friends will not appear on your profile, there are still other ways in which people can see it, such as by using an application. This is because in December 2009 Facebook declared that all users' lists of friends are public information
Friends and Users on Facebook 3
How to Unblock Someone on Facebook
Want to unblock someone on Facebook? This guide will show you how to do it.
Once you have logged in to Facebook, on the top right of the page, click on the Account tab and then select the "Privacy Settings" option, which is the one highlighted in the next image:
Once you have done this, near the bottom center of the page you will see a label that says "Block Lists." Right below it, click on the link that says "Edit your lists," pointed by the red arrow in the next image:
On the new page, near the center of the screen, you will see the list of all the users you blocked. In that list, click on the Unblock link at the right side of the user you want to unblock, as shown in the next image:
Once someone is unblocked, this person will be able to view your profile and contact you within the restrictions of your privacy settings. If you were friends before the blocking, this connection will not be restored unless a new friend request is accepted. Also, keep in mind that, during the next 48 hours after you unblock someone, you cannot block this person again.
Friends and Users on Facebook 2
How to Block Someone on Facebook
Want to block someone on Facebook? This guide will show you how to do it.
Once you have logged in to Facebook, on the top right of the page, click on the Account tab and then select the "Privacy Settings" option, which is the one highlighted in the next image:
Once you have done that, near the bottom center of the page you will see a label that says "Block Lists." Right below it, click on the link that says "Edit your lists," pointed by the red arrow in the next image:
Once you have done this, you will be directed to a new page. On that page, fill in the field near the "Name" label with the name of the person you want to block, and then click on the button that says "Block This User," located at its right side.
Once you have done this, you will see a list with all the Facebook users who have the same name than the one you want to block. Look for the right one in it and click on the "Block" button at its right side in order to block him.
Now that this user is blocked, he can no longer be your friend or interact with you except within applications and games you both use
Friends and Users 1
How to Remove Friends on Facebook
Want to get rid of a "friend" on Facebook? This guide will show you how to do it.
1. First you need to go to your profile. Log in to your Facebook account and then click where it says "Profile," near the top right of the page.
2. Now you need to go to the profile of your "friend". On the left side of the page you will see a sample of your list of friends with their small profile pictures. Click right above them, where it says "See All," and you will access to the full list of them. On that list, look for the one you are going to delete and click on his picture.
3. Now that you are on your "friend's" profile, scroll down the page until you get to the end of the left sidebar. There you will see this: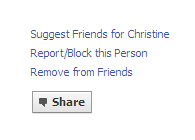
4. Click where it says "Remove from Friends." Facebook will ask you if you are sure, and you will have to confirm it.
When you remove someone from your list of friends, you are automatically removed from theirs. Although Facebook won’t notify you when being removed from a list of friends, you still can deduce it by noticing an absence in your own list.
Facebook Groups 3
How to View Your Groups on Facebook
Do you want to view all the groups you have joined on Facebook? This brief guide will show you how to do it.
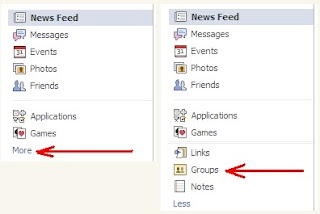
Once you have logged in to Facebook, on the left side of the page, click on the More link and then on the Groups icon, both pointed by the red arrows in the next images:
Once you have clicked on the Groups icon you will automatically see all the groups you have joined on Facebook.
Facebook Groups 2
How to Delete a Group on Facebook
Want to delete a group you created on Facebook? This guide will show you how to do it.
Although there is no available link in Facebook's user interface to delete a group, the system automatically removes groups that have no members. Therefore, to delete a group, you first have to remove all its members and then leave it. If you leave the group without previously removing all its members, the group will remain there and you will lose your admin status, so you won't be able to delete this group anymore. This is the way to do it:
Go to the group you want to delete and click on the link that says "Edit Members" on its left sidebar. Then, on the list of all the members of the group, click on the big X at the right extreme of all of them except you, one by one. Each time you do this you have to confirm the action by clicking on the "Remove" button. Finally, remove yourself by clicking on the X at the right extreme of your appearance in the list. Although you will see a window that says that the admin status will be offered to other people in the group if you leave, this is not true in this case because there are no other members. Just confirm the action by clicking on the "Remove" button and the task will be done.
Facebook Groups 1
How to Create a Group on Facebook
Do you want to start a new group on Facebook? This brief guide will show you how to create it.
Once you have logged in to Facebook, on the left side of the page, click on the More link and then on the Groups icon, both pointed by the red arrows in the next images:
Once you have done that, you will be directed to a new page. At the top right part of this new page you will be able to see a large button that says “+ Create Group”. Click on it and a pop-up box will appear with a form you should fill out. Although the only required field in this form is the name of the group, you can also invite members and set the group's privacy settings from there.
Once you have entered all this data just click on the button that says “Create” and that’s it. You will be the administrator of your own group on Facebook